Using Branching
What is Branching?
Branching is a version control system for Rainforest tests. You can edit and preview tests while the rest of your test suite remains stable, and the rest of your team can continue to run tests, uninterrupted by your experiments.
Your test changes can then be deployed after your software code changes has landed.
| Rainforest Test Branch | Code Branch |
|---|---|
| Edit tests in a separate space (a ‘feature branch’), away from the rest of your test suite | Edit code in a separate space (a ‘feature branch’), away from the rest of your code |
| All tests in the Main branch will continue passing as before | All code in the Main branch will continue working as before |
| After the feature has been released, test edits can be merged from the ‘feature branch’ into the Main branch | When the feature is ready to release, code changes can be merged from the ‘feature branch’ into the Main branch |
| Test merges must be triggered by a human (automatic deployment is planned) | Code merges can be triggered either by a human, or automatically |
With Branching, you can continuously maintain and update your Rainforest tests, as easily as you maintain and update your code. Your code and your tests now move at the same speed.
When is Branching Useful?
Branching is most useful if:
- Your code changes are released continuously
- Multiple team members create and edit tests for different parts of the software
- You want to experiment with tests, but don’t want to break the rest of your test suite
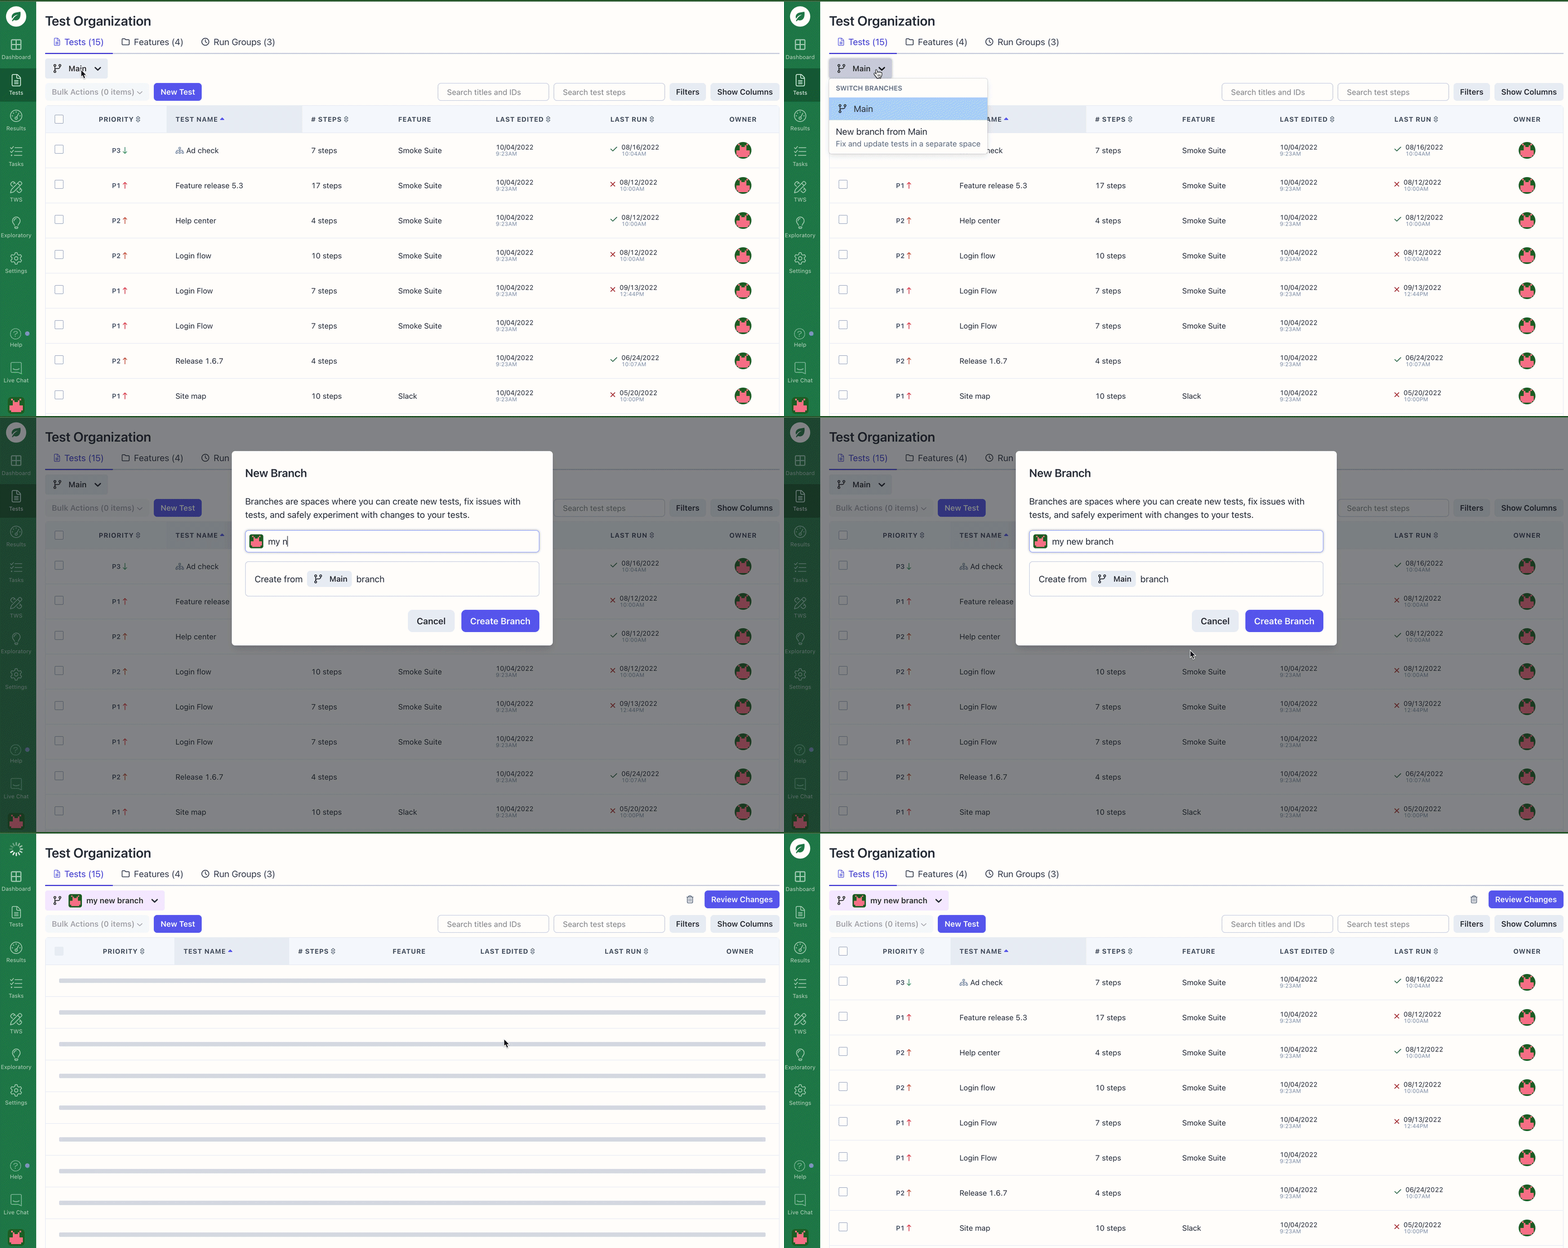
Creating a Branch
- Navigate to the All Tests page
- Click the “Main” button – “Main” is your current test suite, it contains the most recent changes to your tests.
- Select “New branch from Main” in the menu that appears
- Enter a branch name
- Click the “Create Branch” button

Creating a Branch
Pro TipGive your branch a name that reflects the experiment, edits, or fix you’re planning with your tests.
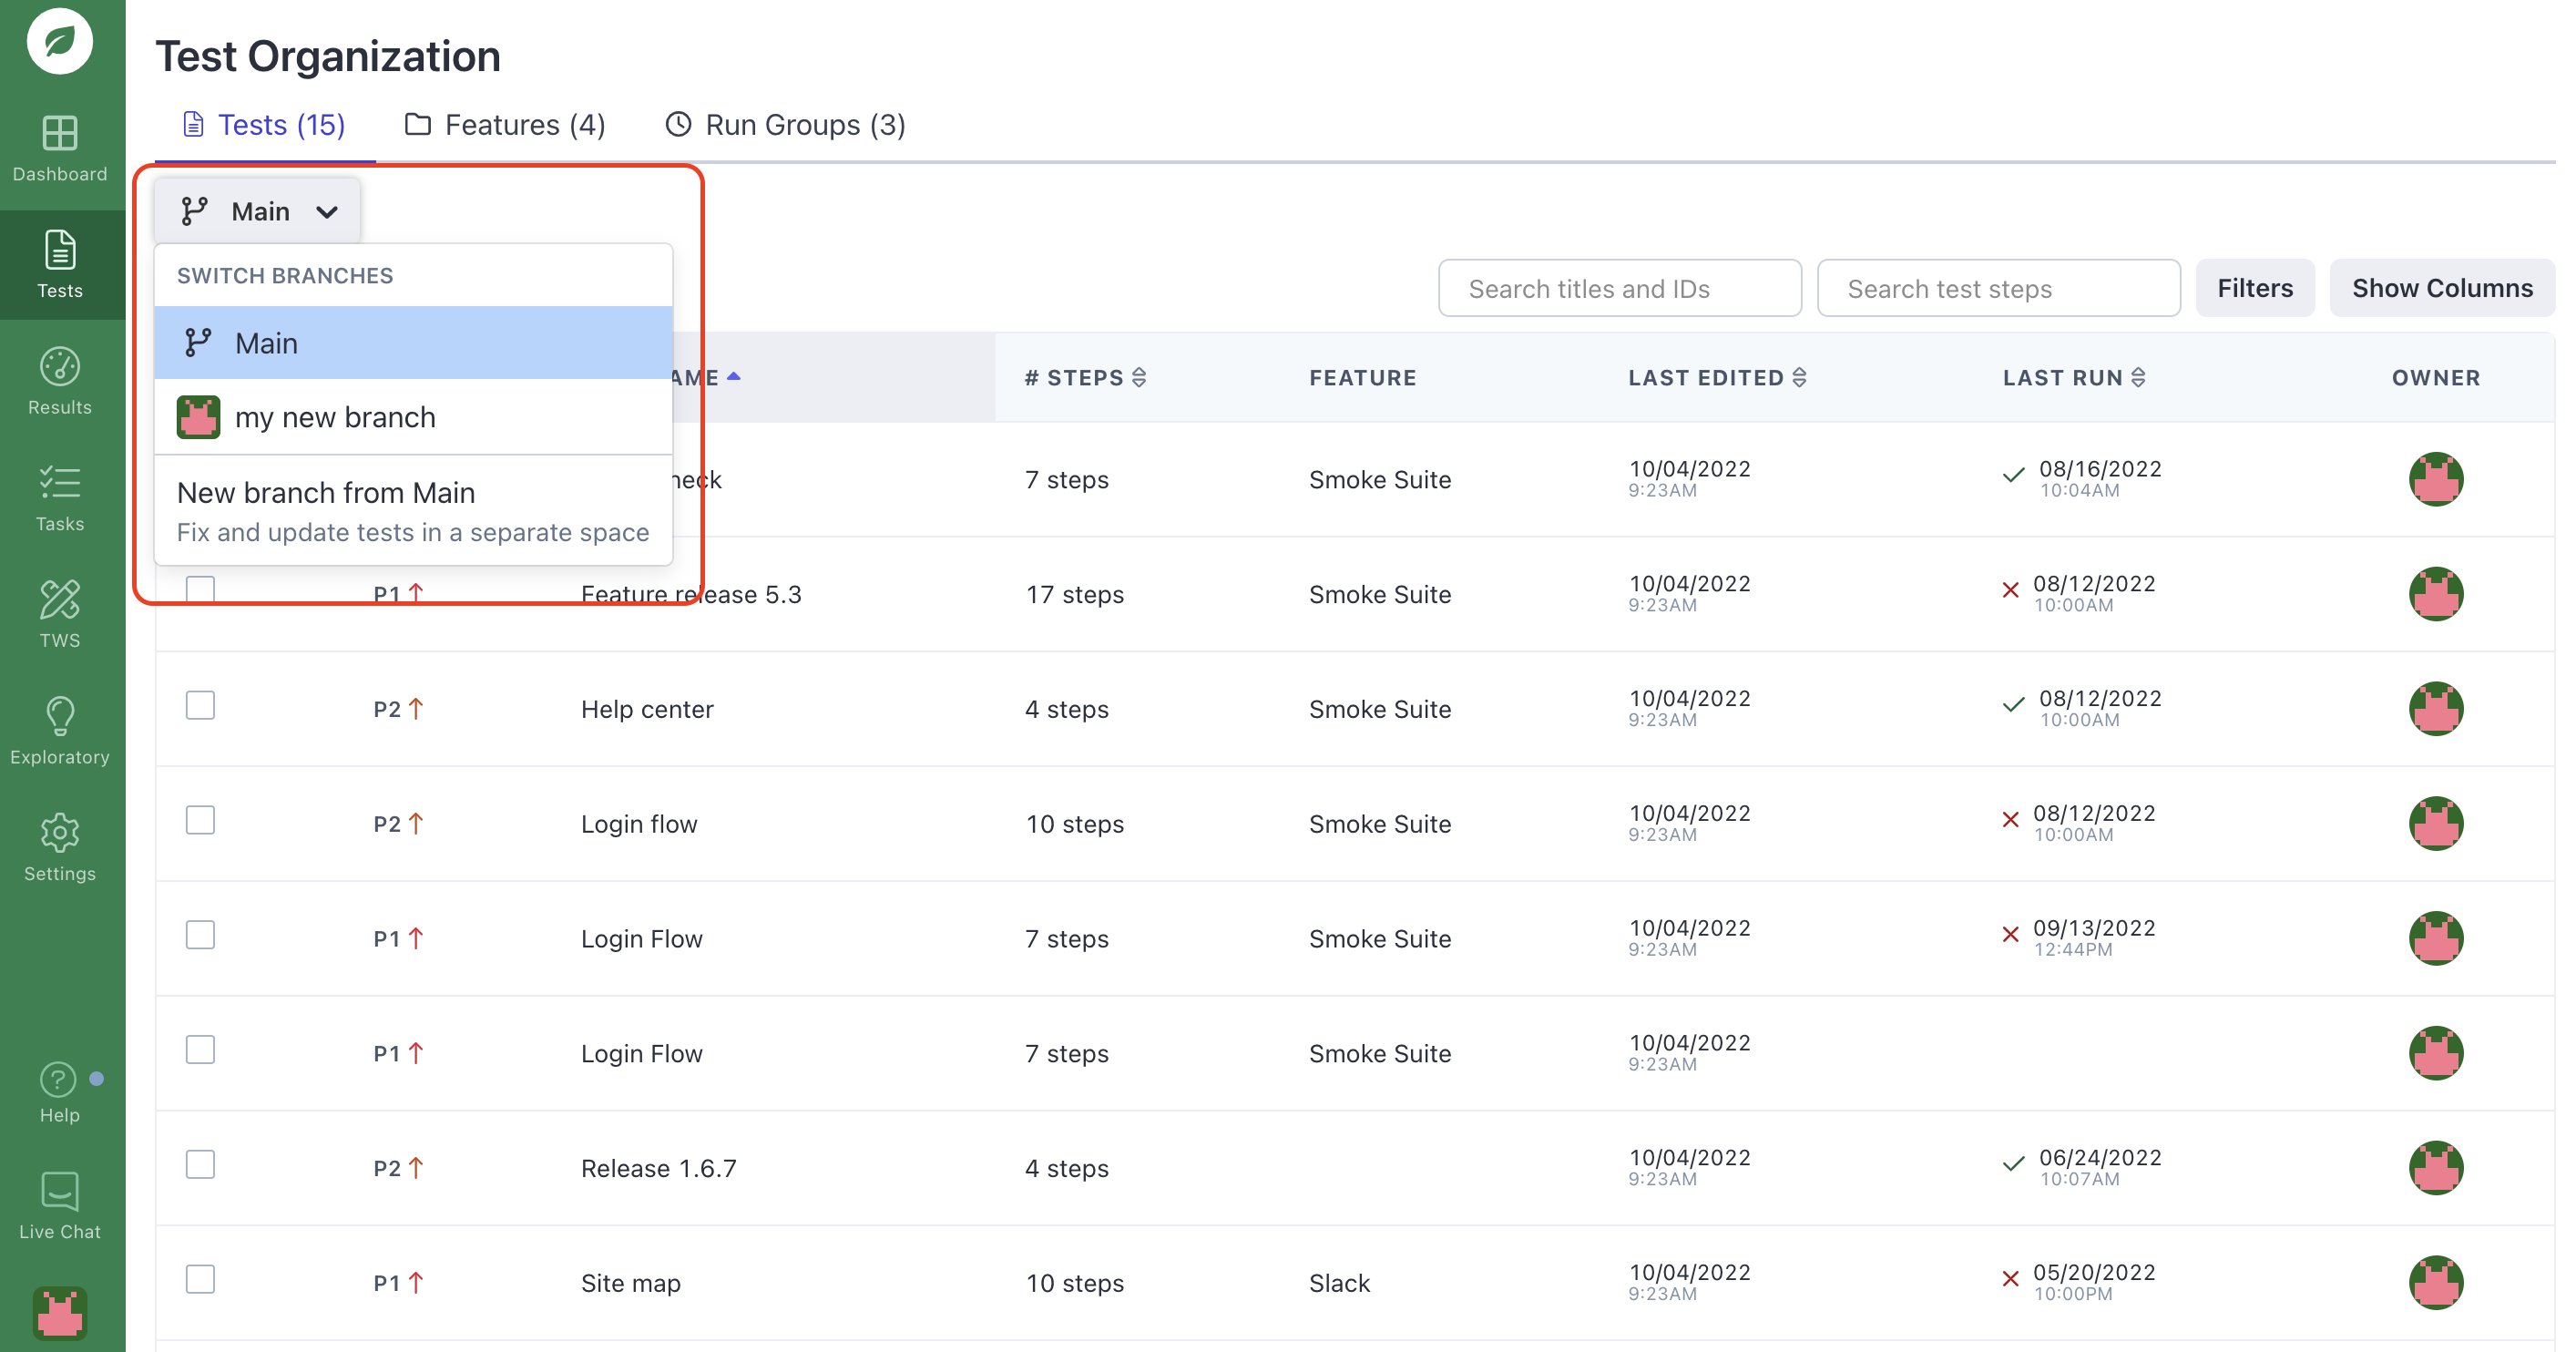
Switching Branches
- Navigate to the All Tests page
- Click the “Main” button
- Select a branch in the menu that appears

Switching Branches
Making Changes to a Branch
- Make sure that you’ve selected the correct feature branch (to ensure you are not making changes to the Main branch).
- Select any test in your list, or click the “New Test” button to create a new one.
- Observe the branch indicator in the Test Editor, showing you which branch you’re currently on.
- Make the necessary changes.
- Click the “Save Changes” button.
Reviewing and Merging Changes
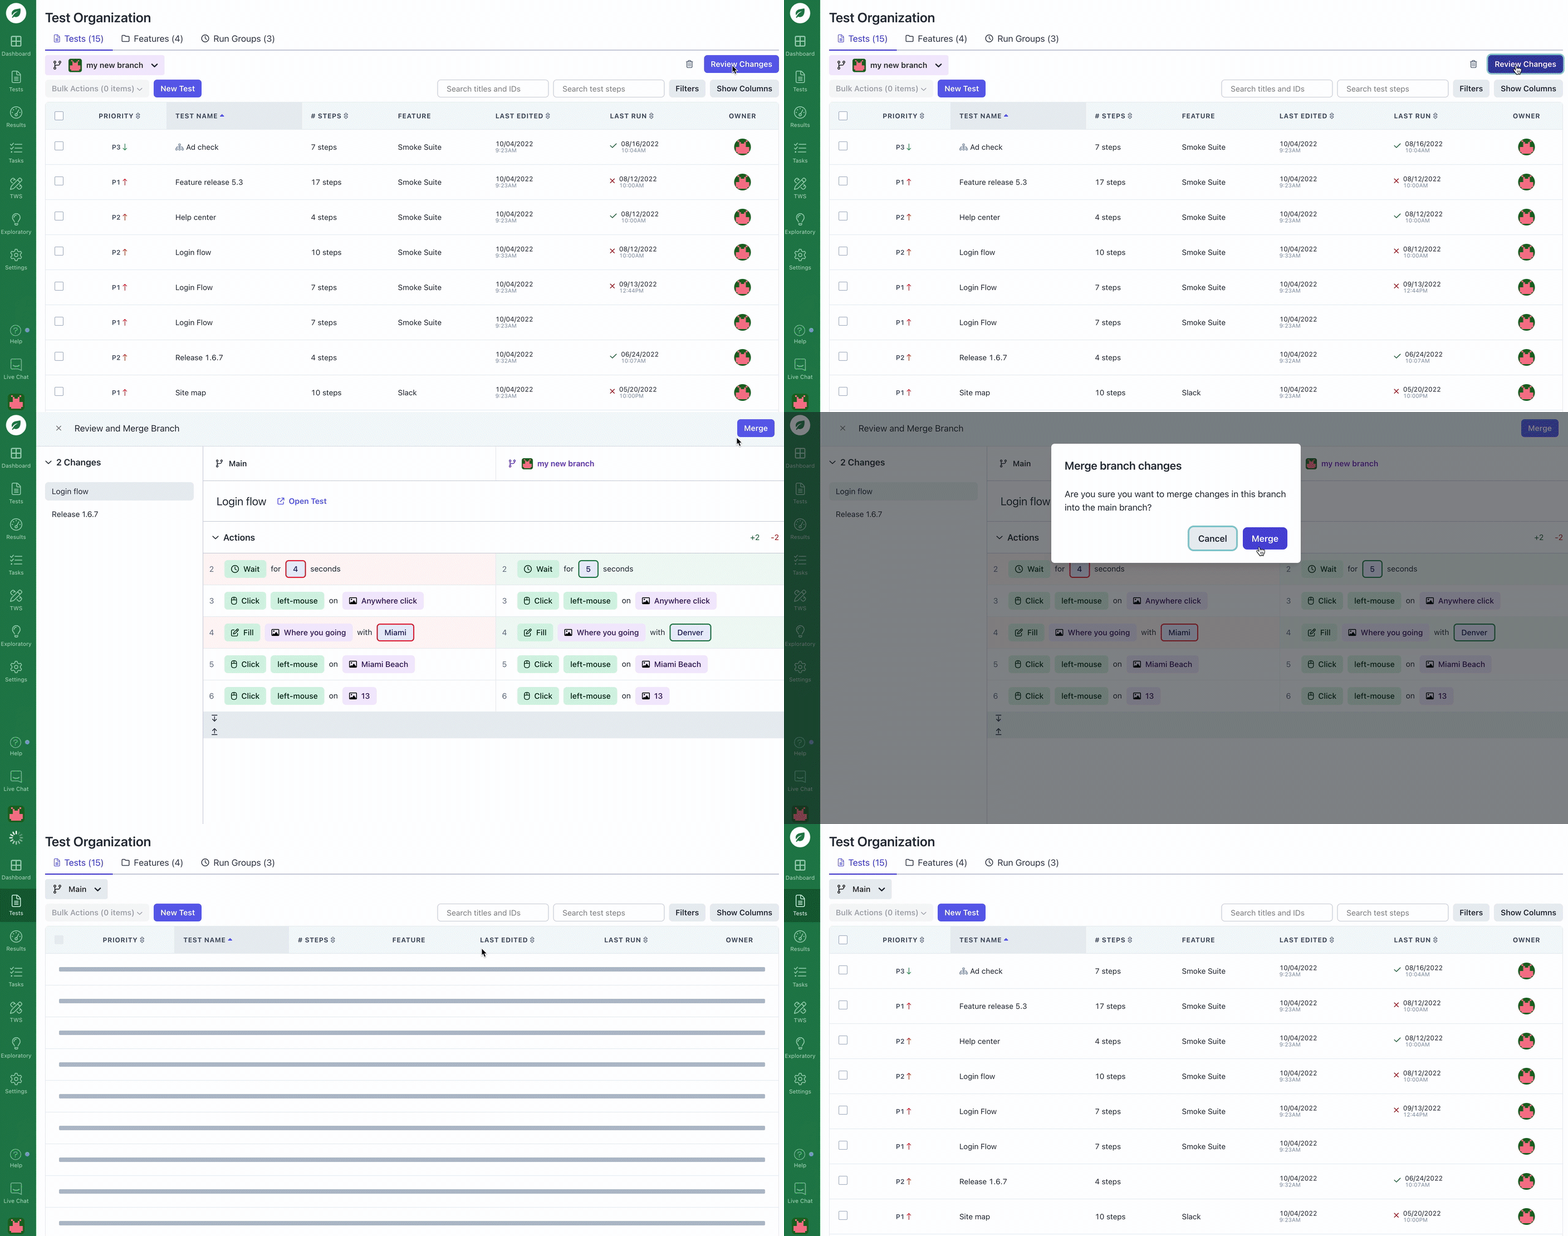
Once you’re finished making all the test changes in a feature branch, you can run them on the feature branch to confirm they pass as intended, and then apply them to the Main branch.
- Make sure that you’ve selected the correct feature branch
- Click the “Review Changes” button on the upper-right side of the page
- Click the “Merge” button on the upper-right side of the page

Reviewing and Merging Changes
Pro TipChanges to your tests should not be applied into the Main branch, until the feature that you’re working on has been released.
If the “Merge” button is disabled, you have a merge conflict and will need to resolve it first.
Review Changes
In this page, you’ll see changes you’ve made in your feature branch (from left to right):
- Changed Tests: This area lists the tests you have changed in this branch. Sometimes, you will see an exclamation mark icon next to a test name. This is a “Merge conflict”. You’ll learn what it is, and how to resolve it, in the next section.
- Changed Actions and Properties: This area compares a test’s actions and properties, between:
- Main What already exists in the Main space, and
- Branch Name What you have changed in this Branch
Understanding Color Code Various colors appear in the Review Changes page. These colors are previews of what’s about to happen. They help you to know whether the tests inside your Branch will be added, removed, or modified in the Main space.
Actual changes will only take place after you click the “Merge” button.
IF Main column row is colored | AND IF Feature Branch column row is colored | THEN After the feature branch has been merged into the Main branch |
|---|---|---|
Blank | Green | The action or property will be added to the test |
Red | Blank | The action or property will be removed from the test |
Red | Green | The action or property already exists in the test, but will be modified For example:
|
You may also see the entire column colored, rather than only specific rows:
- If the entire branch column is colored green
- You have created the entire test from scratch in the feature branch. That test does not exist in Main.
- After the merge, the test will be created in the Main branch.
- If the entire Main column is colored red
- You have deleted the entire test in the feature branch. That test still exists in Main.
- After the merge, the test will be deleted in the Main branch.
When you are satisfied with your work, click the “Merge” button on the top-right corner. The color-coded additions, removals and modifications that exist in your feature branch will now be applied into the Main branch.
What Happens After You Merge?
When you merge changes from a feature branch into the Main branch, Rainforest will take a snapshot of the latest change of each test in that branch. Rainforest will then replace the test in the Main branch with that snapshot.
Merge Conflicts
What is it? A Merge Conflict happens because:
- You are trying to apply a test change that you’ve made in a feature branch, into the Main branch
- But that same test had undergone change(s) in the Main branch
- So Rainforest doesn’t know which change should be applied
This scenario can happen when:
- You open a feature branch and make changes to Test A
- A team member has opened their own feature branch, changed Test A, then merged/applied it into the Main branch
- Or, somebody had gone into the Main branch and changed Test A there directly
Rainforest detects these ‘change collisions’ each time you review changes. It’s called a ‘Merge Conflict’.
How to resolve it When a merge conflict happens, Rainforest will ask you to pick which change should be applied, and which one should be discarded:
- Pick Main -The change that exists in the Main branch is the correct one. Replace the change in your feature branch with it.
- Pick Branch -The change that exists in your feature branch is the correct one. Replace the change in the Main branch with it.
When you have picked an option, Rainforest will immediately apply the change you’ve requested. After picking an option, you might want to edit the test again to apply any remaining changes you need “on top” of the previous update.
When all Merge Conflicts are resolved, the “Merge” button will be enabled. This means that you can now safely apply all the changes in your branch into the Main space.
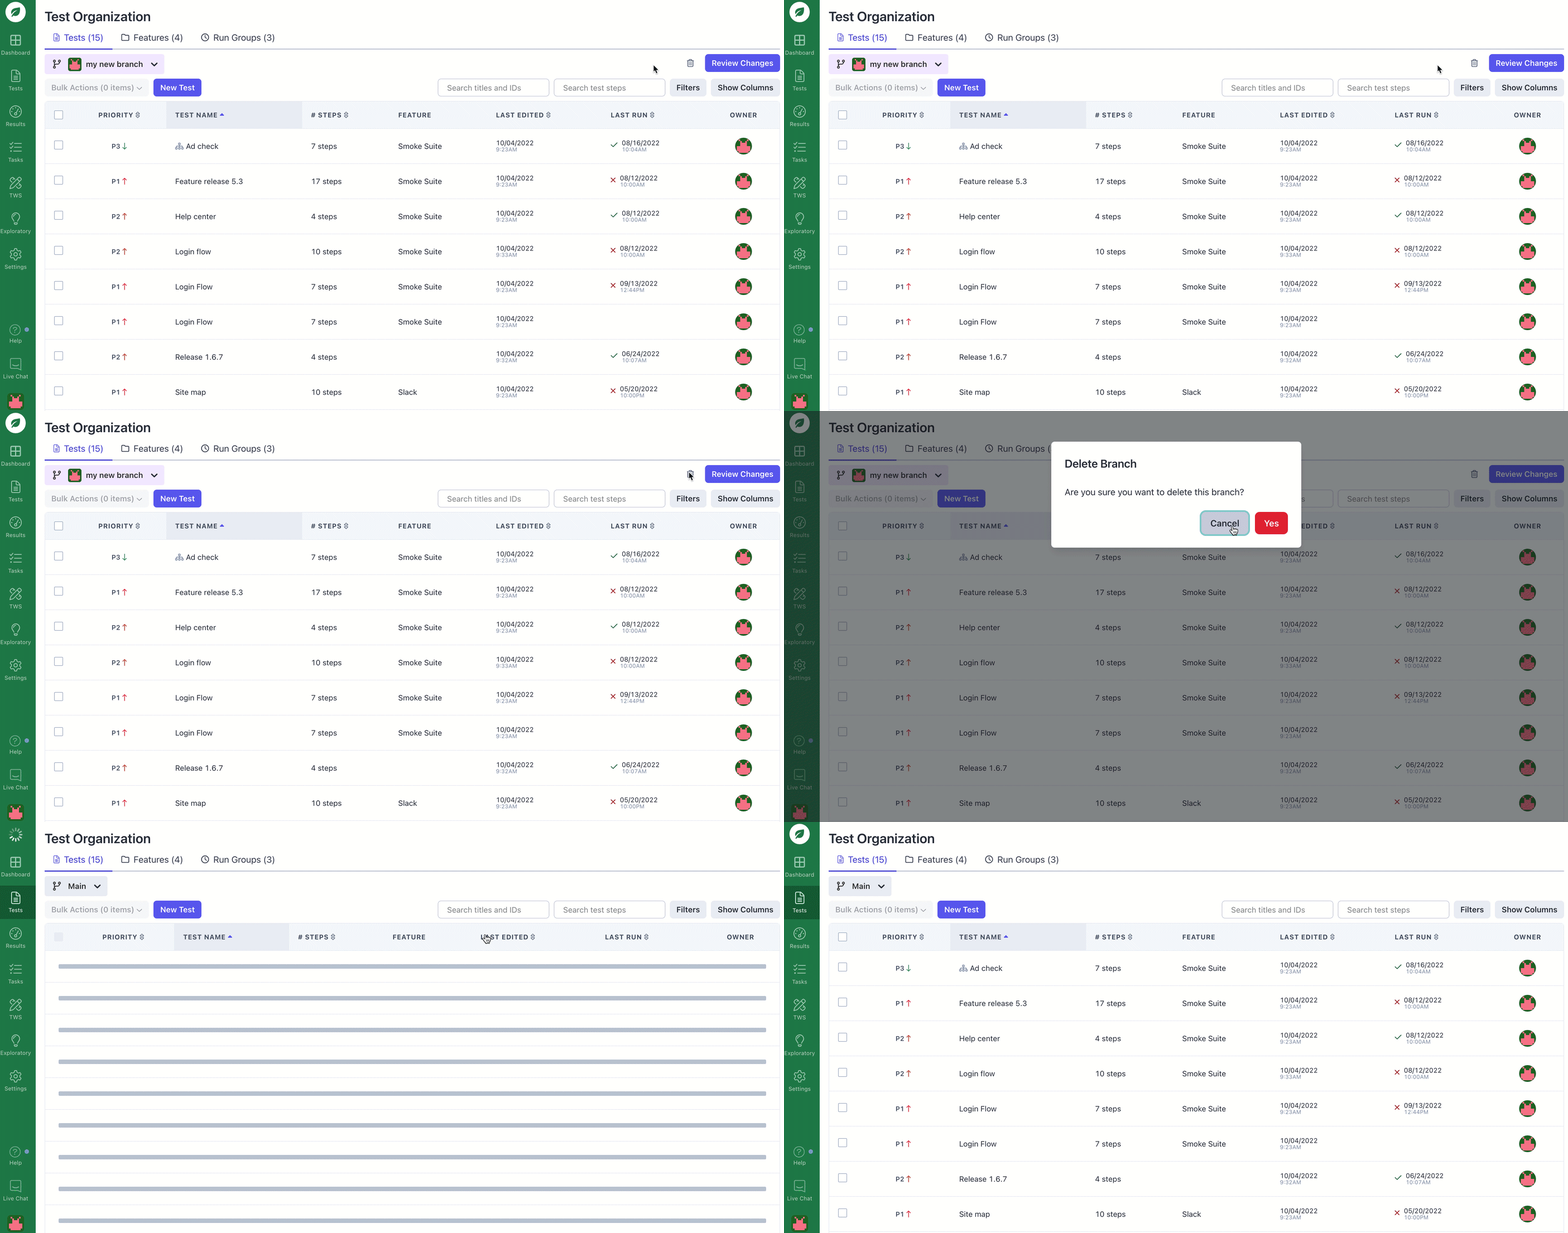
Deleting a Branch
If you are dissatisfied with the change you’ve made in a branch, you can get rid of it.
To do so, click the “Delete” button (trash icon) on the upper-right side of the page. This button is located to the left of the “Review Changes” button.

Deleting a Branch
Concepts and FAQs
What is a Branch? Think of each Branch as a box where all your tests are stored. When you create your own Branch, you also create a box.
Having a separate Branch box has many uses. One of them is, if you change any test inside this box, the change will only be applied there. It will not impact the ‘Main’ box. Any test in the ‘Main’ box will continue to pass, as before.
You don’t have to make only one change in a Branch, either. You can also change multiple tests.
This is useful, because sometimes you need to create or modify many tests in order to support a new or existing feature in your software.
Once the feature ships, you know that you have already wrote tests for it. Those tests are stored in a ‘Branch’. At this point, you can manually apply those changes into the Main space.
Pro TipWe suggest that you open branches frequently (for each new feature) and merge them back to main after a short time. Frequent, short-lived branches mean that the changes on each branch will be small and easy to understand and the chance of conflicts minimized.
What is ‘Main’? Think of the Main space as a special box that contains the very latest changes to all your tests.
The Main space is special, because if you change any test while you’re in there, that modification will also be applied to all the other Branch you have opened – as long as you have not modified the very same test in the Branch.
Where is the best place to make changes? In the Main branch, or the feature Branch? Although you can certainly change any test directly while you’re in the Main branch, we suggest that you open a feature branches and make your changes there.
Why?
By opening a feature branch, you will do two actions separately:
- Changing one or more tests
- Applying those changes from your feature branch into the Main branch
This separation has a few benefits:
- You will know exactly when your changes are applied into the Main space. This helps the Main space to keep a record/history of how a test has changed over time.
- You will be able to review the changes that your team members are about to make, before they apply it into the Main space. Similarly, your team members will also be able to review your work!
In software development, using branches and regularly reviewing changes is a widely accepted and orderly way to release code as a team. Similarly, using branches and regularly reviewing changes in Rainforest is a way to organize your test suite, especially when multiple people are working on it.
Auto-rebase: Why do my Tests in a feature branch keep changing to reflect the latest state of the Tests in the Main branch?
What is it? This scenario sometimes happen:
- You open a feature branch and make changes to Test A
- A team member has opened their own feature branch, changed Test B, then merged/applied it into the Main space
- Or, somebody had gone into the Main space and changed Test B there directly
In this scenario, a change has happened to a test which you have not worked on in a feature branch.
Rainforest detects these ‘changes to tests you’re not working on’, and automatically apply those changes into your feature branch.
By doing this, all the tests stored in your feature branch are always up to date, other than the ones you are changing. This process is called ‘Auto-rebase’.
Why is it useful Without ‘Auto-rebase’, your feature branch will contain out of date copies of tests.
When you try to apply your changes into the Main branch, Rainforest will ask:
Test B in the Main branch is different from Test B in the feature branch? Choose which one is the correct Test B.
Making this decision for only one test is easy, but if you have many people applying changes to many tests, it would be time consuming.
‘Auto-rebase’ reconciles tests that others have changed, as soon as those changes are applied in the Main branch. Your feature branch would always receive the most updated tests that others have changed in the Main branch. Doing this will save you a lot of time when applying changes.
Other than Test Actions, what other things can I change in a feature branch? You can change these Test Settings while you’re inside a feature branch:
- Disable this test from running
- Set this test to draft
- Internal Notes
- Delete test
What are things that I cannot change in a feature branch?
When you open a test inside a feature branch, you’ll find that some Test Settings are disabled and cannot be changed:
- Delay between actions
- Test Priority
- Feature
- Run Groups
- Tags
- Location
- Platforms
- Test Owner
Additionally, in the feature branch, you also cannot add, delete or change:
- Features
- Run Groups
You can only change these in the Main branch.
How do I modify a Test that somebody had changed in their feature branch safely, without impacting any other Tests they are working on? While you cannot currently do this, Rainforest is building Versioning and making it available in the near future.
With Versioning, every time you click the “Save changes” button in the Visual Test Editor, Rainforest will create a version – a record with your name and timestamp on it.
You and your team members will be able to use this information to track changes at the level of individual Tests, and Restore previous versions of a Test.
If you manage your code in a system like GitHub, you might do the same thing by creating a branch off another branch. In Rainforest, a feature branch may only be created from the Main branch.
If you have any questions, reach out to us at [email protected].
Updated 4 months ago
